On the way to work last week out of the corner of my I spotted my next redo, at first my thought was no I'm not going to stop and I didn't. After thinking about it all day and night I went back the next and AHHH it was still there!!! It was not the best looking thing,but I could already see it done in my head...
First thing I knew had to go was the UGLY brown plastic leather, and I knew just what I wanted.... Burlap coffee sack, I had some extra form a project a while back and knew it would be perfect.....
Next was the color, I chose a blue/gray color which I thought ended up looking GREAT with the burlap....
Next came the distressing, and this time i chose to wax the piece instead of glazing and it ended up great!!! Then it came time to take pictures and post to sale,which I thought my mind was made that I would sale the bench, but I grew attached and even found the perfect place for it... But I said to myself you can't keep every piece that is done. :( :( :( So here it is and I hope to sell it soon!!!

Saturday, May 28, 2011
Thursday, May 26, 2011
Re~Dunagan Paint & Design
Hi bloggers, i have just created a new facebook page http://www.facebook.com/pages/ReDunagan-Paint-Design/168438436551236#!/pages/ReDunagan-Paint-Design/168438436551236 so please go and "like".. I would greatly appreciate it!!! I will leave with you tonight a couple of chest redo's.
Saturday, May 14, 2011
{As easy as 1..2..3..}
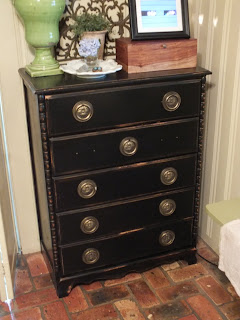
For a while now I have had this inexpensive TJ-Max find in my bedroom, and on the spur of the moment decided it needed a lil' spiffing up. Here is what took place in three easy steps:
Since this small black chest came already painted black when I purchased, the first step i used a palm sander and hit all the edges and any place where natural wear would take place.
After I got the desired distressing i wanted, I cleaned the chest down with Spray Nine if you have never used this product it is a must have for any cleaning job, it can be found at your local hardware store for around $5 bucks.
 |
| Best product out there.. |
Next came the waxing process, I like to use on black or any dark furniture MINWAX finishing wax {dark} that can be purchased at your local hardware store for around $8 bucks. I like to apply this with a worn out paint brush, covering the whole piece with a taping motion not brushing like you would paint. Now it's time to wait about 15-20 minutes until a haze appears.
Did I mention how much I love the bottom of this piece!
The last step is, buffing to bring the richness out this step really makes the piece and makes it extraordinary!
That's all until next time...
Friday, May 13, 2011
Pine City Delight: Featured Furniture Redo
Pine City Delight: Featured Furniture Redo: "Good evening, for my first post I want to share with you a chunky china cabinet redo. At the shop we just recently started carrying Mariana ..."
Featured Furniture Redo
Good evening, for my first post I want to share with you a chunky china cabinet redo. At the shop we just recently started carrying Mariana Jewelry and have been looking for the perfect lighted case to house it, the shops owner had this old chunky china cabinet that went with a dining room set she used long ago, and was just storing it in a rental house so she said she would bring it in if I was up for the challenge. Guess what I said "Bring it on!!!" . Not knowing the detail work I was getting myself into, with two long days of work this this ordinary "chunky china cabinet" turned into something extraordinary.
This bad boy was once a big, heavy, ordinary ,and old brown china cabinet and now a light and refreshing piece of work!!!
Do you see what I mean by detail work! And may I add all by hand with just a paint brush getting into every nook and cranny!!! More pictures and the products and methods I used will follow soon!! Hope you enjoy as much we do at the shop.
Subscribe to:
Posts (Atom)


